When it came to choosing a blogging platform for my new online business I had several choices already available in my arsenal. To choose the best platform to run with I had to look at the merits of each platform, then decide on the best for my situation.
My Blogging Requirements
The blogging environment I wanted to create was one where content is distributed to a variety of places, such as blogging platforms and my branded social media sites.
At the beginning of my new business, I wanted it to concentrate on three distinct content categories:
- A journal of my journey to a full-time income
- Product reviews
- General digital marketing articles
I also want to start a membership site pretty early on in my journey too, but I didn’t make this an important criterion when choosing my primary blogging platform. This is because there are numerous options at my disposal to host my membership site, so it didn’t need to be an integral part of my blogging platform.
Another factor to consider was the tools I already had at my disposal. I had a number of tools available that would specifically help with my writing, publishing, and distribution of my blog posts.
Content Distribution
One of the main functions I wanted my blogging setup to achieve was to distribute my blog posts across a wide network of blogging platforms and social media sites that were branded to my business.
The benefit behind this approach is to get a boost with internet search engines such as Google and Bing. If your content is in numerous places, with links back to the original article, this can build the authority of the article and consequently your website authority much quicker.
It also means I have a greater potential of getting my message or story in front of more of my target audience. I am sure there are a lot more eyes on Twitter and Facebook than there will be on my blog.
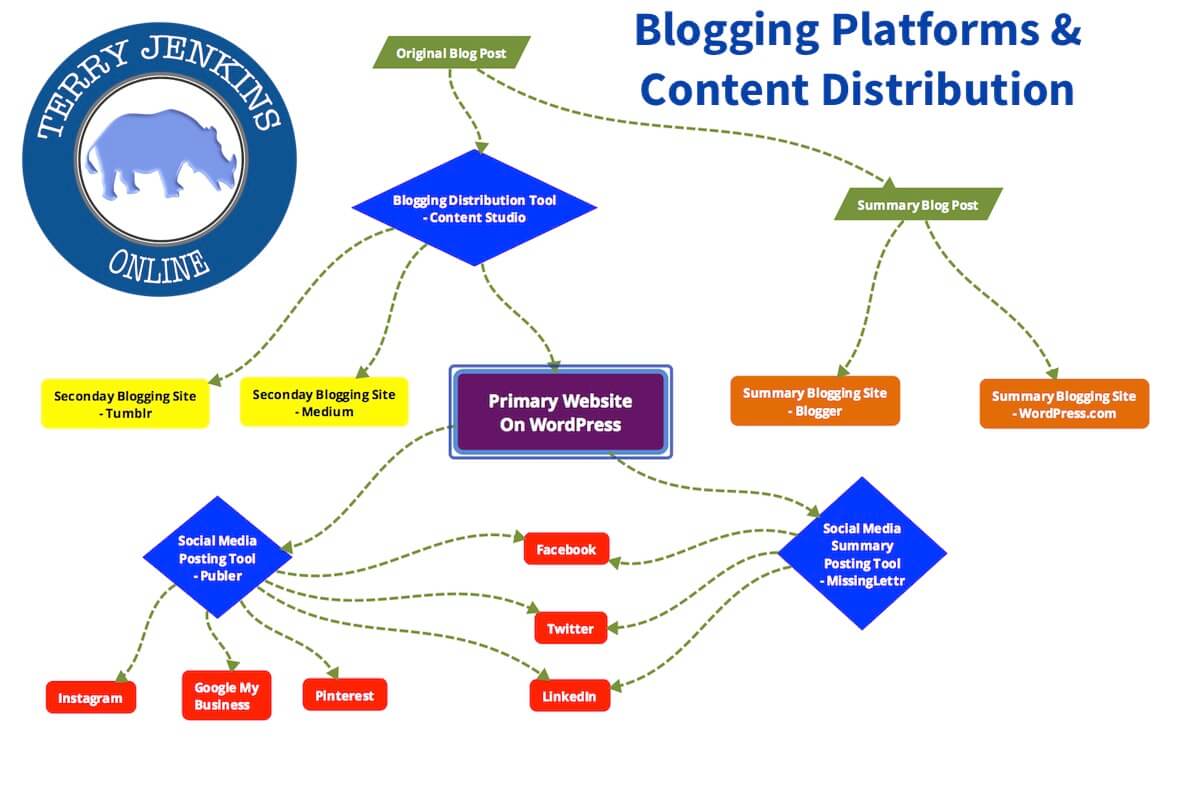
I had an idea in my head of how I wanted the content from my blog posts to be distributed. You can see this in the mind map below:

In this scenario, I create one original blog post and use a distribution tool to send it to my primary website and two or three secondary blogging platforms.
I then make a summary blog from the original blog post and post it on a couple of additional blogging platforms.
I then use social media posting tools to push out links to the original blog post on my branded social media accounts.
I hope that sounds simple because once it is all set up most of the posting is automated.
I also hope you can see the power of pushing the content around the internet this way. One piece of content has ended up on several of my branded platforms by using automation tools.
It was important to explore this concept first, as it would play a big role in deciding which blogging platforms to use.
I will come back to this later in the article when I explain the platforms I used and why.
Content Categories
There are benefits in splitting your blog content into distinct categories. For one, it makes it easier to find your own content when you want to link to it or post it to social media.
From a search engine perspective, clustering similar content into one distinct category helps Google and Bing to determine what your sub-niche is much quicker too. By only clustering related articles into one category type then linking the articles together, you are declaring this category is for one subject and one subject only.
This increases your authority as the content is not ‘watered down’ over a myriad of subjects.
If you want to get this approach spectacularly wrong, mix motorbike topics with blogs about designer dresses in the same category and see where that gets you in the search engine rankings.
Me, I will stick with keeping my content in the appropriate category.
Content Distribution Tools
This is one area that has evolved a lot in the last 4 or 5 years.
I have purchased a few of these tools in the past and picked them up at a bargain price when they were still in development. In hindsight, this is one area where I have picked the right tools at the right time for an incredible price. These tools are still available and working, plus they have been developed much further over the last few years since I purchased them.
So the tools I have at my disposal are as follows:
- Content Studio
- Publer
- MissingLettr
Content Studio
Content Studio allows you to write, curate, or schedule both blog content and social media content. It works with a decent number of platforms too. You can write your blog post in the tool itself, mark up (format) the content, and import the images.
It also has the ability to curate blog posts from another website in your chosen category. This allows you to post them with a link to your social media website. It’s a great way of getting topic related content to your social media feeds quickly and efficiently.
Plus, you can either publish immediately or schedule the posts for a specific day or time.

From a blogging perspective, you can post to your own WordPress blog, Tumblr, Medium, or even your Shopify blog if you have a Shopify store (I don’t).
In Addition, Content Studio posts to the following social media channels:
- Google My Business
I will use Content Studio to both write my blog posts and to distribute them to my WordPress blog, Tumblr, and Medium. I am using Content Studio to write this blog post now.
My intention is to publish the majority of my blog posts to my own blog, then schedule the blog post to Medium and Tumblr a few days later. Content Studio makes this easy to achieve.
I decided against using Content Studio as my primary means to post to my social media accounts though. I will use Publer for that, as I will explain in the next section.
Publer
This is a tool I picked up relatively recently. Again, I have a lifetime account and a pretty powerful set of features.
Publer posts to the exact same social media channels as Content Studio, but I chose to use Publer for a number of reasons:
1) By using one tool to post to my blog and another to my social channels would help differentiate the type of content I am posting.
2) Publer has built-in analytics so you can see how each post performs on each social media platform.
3) Publer works directly with my link cloaking tool. This allows me to post links that are branded to my website and helps to mask my affiliate links from social media sites.
4) Publer has a preview option. This lets you see what the post will appear like on each social channel, allowing you to make adjustments if needed.

I have used Content Studio in the past to publish to social channels and I am using Publer for the first time with this project. It will be interesting to see how Publer performs and how easy it is to use.
You will have to wait until I review both to see my verdict.
MissingLettr
This tool works differently to the tools above, but it is the one tool I regularly see recommended over and over again as being a favourite of content producers and bloggers.
MissingLettr uses the RSS feed* from your blog to grab blog posts as you publish them. It then creates a series of posts for the coming year using artificial intelligence (AI) and the text and images of your blog post.
Once scheduled, it posts them to Facebook, Twitter, and LinkedIn over a 12 month period.
It notifies you via email that a new campaign has been created, allowing you to go in and authorise, change, and schedule your posts. It creates around 14 posts that are posted over 12 months. The majority are in the first month and the frequency of posting reduces over the year.

The real benefit of MissingLettr is you can bring people back to your popular posts on automatic over a full year.
At the end of the 12 months, if you have an evergreen post, you can just tell MissingLettr to run the campaign again.
The beauty of this is you can build a constant supply of social media posts that draw readers back to your blog posts without any effort once you have the original campaign set up and authorised.
MissingLettr does a pretty decent job of building viable social media posts from your blog and it is easy to tweak or alter any you are not happy with.
* An RSS feed is usually available on most blogging systems. It is generated by the system and is an electronic summary of your blog posts. If you want to know more, then just Google it.
My Blogging Platforms
Now I have determined how I want my content distribution to work and what tools I am using I can now decide on my blogging platforms.
The blogging platforms I had to choose from for my primary blog were:
- WordPress
- Rapidweaver/Foundry/Alloy (HTML platform)
- Kyvio
- GrooveFunnels
Potentially there are a number of other blogging platforms, but I dismissed these as I wanted to have full control of my blogging environment.
My primary platform was pretty easy to choose once I had picked the content distribution tools I would use. The only platform that I had full control over and could schedule posts to was WordPress.
The other platforms I could post directly from Content Studio to were Medium and Tumblr, so these became my secondary blogging platforms.
Content Studio creates canonical references to the primary blogging website when it posts to the secondary ones. This tells the search engines that the original and important blog post is the WordPress one and the other 2 platforms were reprints from it.
By using canonical references it eliminates the problem of duplicate content penalties from the search engines.
The other platforms above really didn’t get a look in for what I am trying to achieve with my blog. Nevertheless, I will give you a quick breakdown/review here:
1) RapidWeaver
This is an HTML website design platform similar to Dreamweaver. Foundry is an add-on package that allows you to build your webpage in blocks and Alloy is the blogging platform for Foundry.
I have all of these tools in my arsenal and have built websites with them previously.
This system has the advantage of improved security over WordPress, but it would require the manual posting of my blog posts as it doesn’t work with any of the automation tools. For this reason, I dismissed it.
2) Kyvio
I have lifetime access to Kyvio. I purchased this when it was first released around 3 or 4 years ago. It was originally released under the name InstaSuite.
Kyvio is a suite of tools that allows you to build webpages, blogs, training courses, membership sites, and send emails to people. It is a great tool I have used in the past and it is still being developed by Neil Napier and the Kyvio team.
Kyvio 2.0 has recently been launched and I had full access to it at no extra cost due to my lifetime account.
I will consider Kyvio for my membership platform, but for the same reason as the RapidWeaver suite above, I dismissed it as it was not compatible with the scheduling tools I wanted to use.
3) GrooveFunnels
The best way to describe GrooveFunnels is like Kyvio on steroids. Or it will be when it is fully developed and the full suite of services is available.
At the time of writing (September 2020), GrooveFunnels is still in beta testing for the modules available.
There are several modules still to be released to beta testing. One of these is GrooveBlog, which is the blogging platform. As this is still not available to use, let alone a stable platform, it couldn’t be considered at this stage.
I will keep an open mind as to whether to migrate the blog to GrooveBlog in the future as the full suite of GrooveFunnels tools will be incredibly powerful once they are all available and out of beta testing.
My Final Blogging Set-up
Having determined my requirements and studied all the options available to me, I have finally come up with my content distribution plan for my blogging platforms.
I have updated the diagram posted above to include the platforms I have chosen and the social media sites I will push my content to:

In addition to what is shown above, I also have credits in a system called Quuu Promote.
Quuu Promote allows you to put forward your blog post to be posted by other marketers and bloggers in your niche.
It works by putting your blog post in front of these people so they can choose to post it to their social media channels. This is a great way for them to get relevant content for their social media platforms and for you to get your content in front of more people. Win-Win as they say.
You need one credit for each post you submit and there are criteria you need to meet for your post to be accepted.
The credits are a little bit pricey, but, like a lot of my tools, I bought into this system in the early days and got a really juicy deal compared to today’s prices. The credits I have should keep me going for at least a couple of years.
Does It Work?
So there you have it, my system for internet domination.
‘But does it work?’, I hear you cry.
Well, yes it does. I have already published 3 blog posts using Content Studio and they have worked incredibly well.
I have yet to use the social media system as I want to specifically post all of the blog posts that cover my journey to a full-time income into a Facebook group and that group doesn’t exist yet.
Nevertheless, I have used Publer to post to my social media channels and it works as expected and MissingLettr is receiving the RSS feed and creating campaigns for each blog post as I publish it.
So, I am confident the full system is working as expected.
. . .
In my next article, I will cover the set-up of my social media network. Much of it was mentioned in this article, but there are a few extra things I am doing there that are not related to my blog posts.
Until then, keep safe.